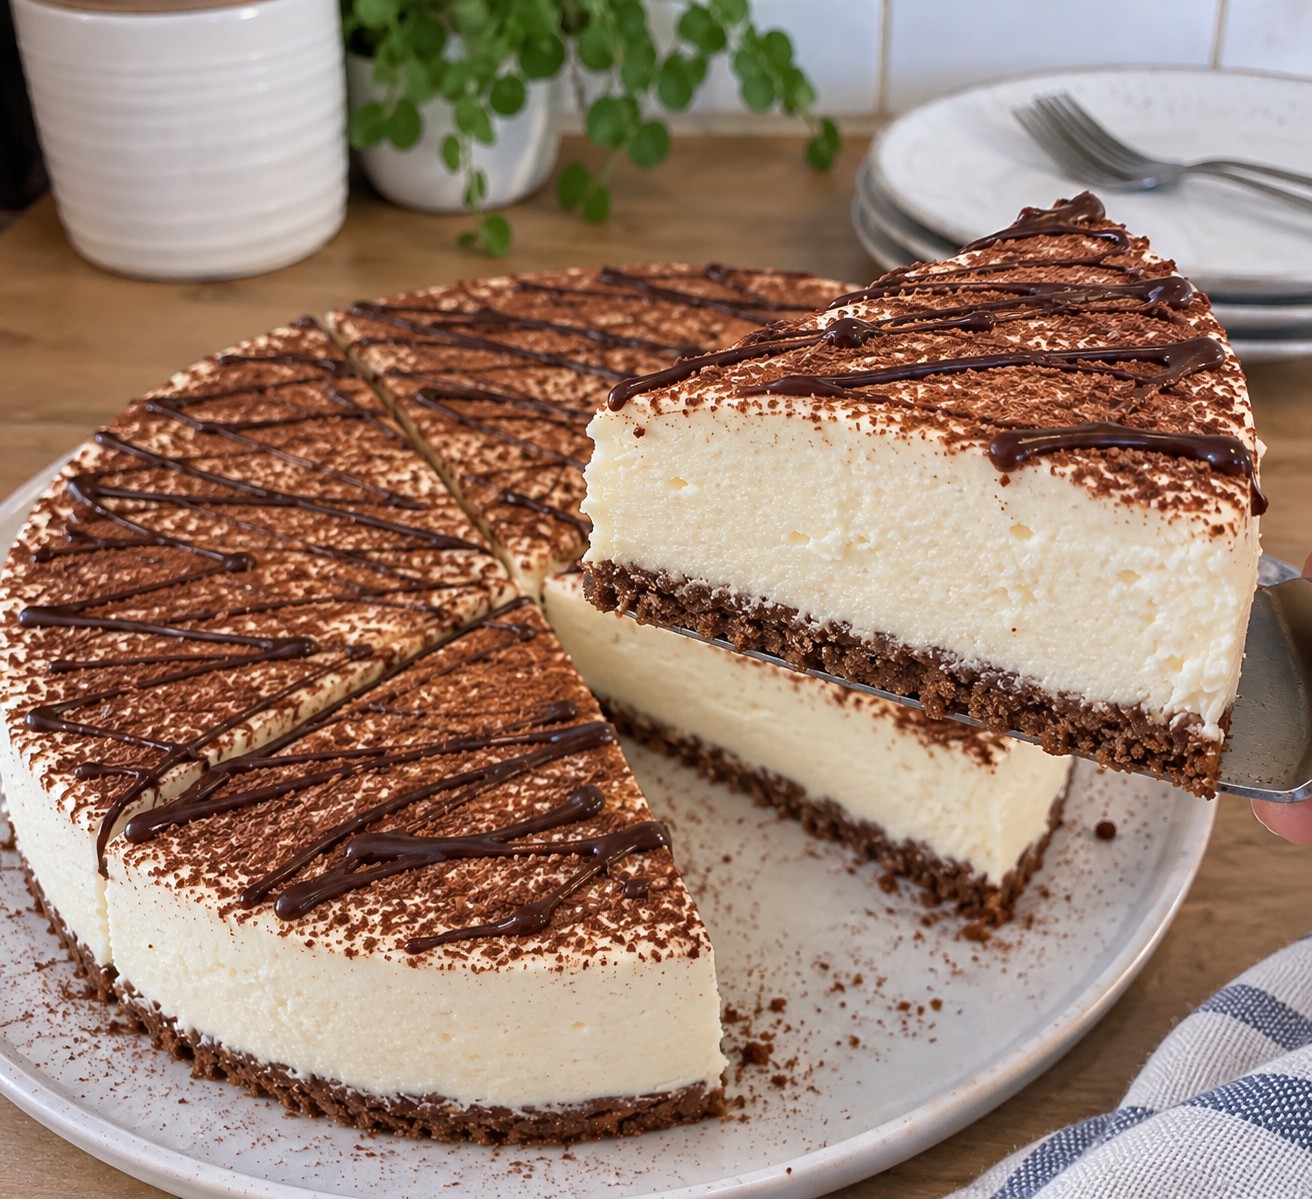
This homemade cheesecake is straightforward to prepare. The most important part is allowing enough time for the filling to set properly.
Step 1: Prepare the Chocolate Biscuit Base
Place the bourbon cream biscuits in a food processor and blend until finely crushed.
Alternatively, put them in a food bag and crush them carefully with a rolling pin.
Transfer the biscuit crumbs to a mixing bowl.
Melt the low-fat spread, then pour it over the crushed biscuits.
Mix thoroughly until the crumbs are evenly coated.
Spoon the mixture into an 18cm springform cake tin.
Using the back of a spoon, press the crumbs firmly into an even layer across the bottom of the tin.
Cover the tin and refrigerate for approximately 30 minutes.
This helps the base firm up before you add the filling.
Step 2: Prepare the Jelly and Gelatine
While the biscuit base is chilling, pour 250ml boiling water into a heatproof measuring jug.
Add the lemon and lime jelly crystals and powdered gelatine.
Stir thoroughly until everything has completely dissolved.
Set the mixture aside and allow it to cool completely while remaining liquid.
Important: The jelly mixture should no longer be hot when you combine it with the yoghurt. Follow the gelatine manufacturer’s instructions if its preparation requirements differ.
Step 3: Make the Creamy Vanilla Filling
Add the vanilla yoghurt, vanilla extract, quark and granulated sweetener to a food processor.
Pour in the cooled jelly and gelatine mixture.
Blend until the ingredients are completely combined and the filling is smooth.
Taste the mixture and adjust the sweetness slightly if needed, keeping in mind that different sweetener brands can vary in intensity.
Remove the chilled biscuit base from the fridge.
Carefully pour the vanilla cheesecake mixture over the base.
Use a spatula to smooth the surface, then cover the tin without touching the filling.
Place the cheesecake in the fridge overnight, or until completely set.
Step 4: Melt the Dark Chocolate
When the cheesecake has fully set and you’re ready to serve, prepare the chocolate topping.
Place the dark chocolate pieces in a heatproof bowl.
Set the bowl over a saucepan containing a little gently simmering water, making sure the bottom of the bowl doesn’t touch the water.
Stir occasionally until the chocolate has melted and is smooth.
Alternatively, melt the chocolate in the microwave using short bursts on a low setting, stirring between each burst.
Allow it to cool slightly so that it is still fluid but not excessively hot.
Step 5: Decorate and Serve
Carefully run a warm palette knife around the inside edge of the cheesecake tin.
Release the springform ring and gently transfer the cheesecake to a serving plate.
Using a teaspoon, drizzle the melted dark chocolate over the top in thin lines.
Lightly dust with the cocoa powder.
Cut into 8 equal wedges using a sharp knife.
For neat slices, wipe the knife clean between cuts.
Serve chilled and enjoy!
Tips for Making the Perfect No-Bake Cheesecake
Crush the Biscuits Finely
Small, even biscuit crumbs make it easier to create a compact base that holds together when sliced.
If the crumbs are too coarse, the base may break apart when you remove the cheesecake from the tin.
Press the Base Firmly
Use the back of a spoon or the bottom of a small glass to press the biscuit mixture evenly into the tin.
A well-compacted base will be easier to cut and serve.
Cool the Jelly Before Mixing
Adding very hot jelly to the yoghurt can affect the filling’s texture.
Allow the dissolved jelly and gelatine mixture to cool before blending, but don’t let it begin to set.
Give the Cheesecake Plenty of Time to Set
For the most reliable results, leave the cheesecake in the fridge overnight.
Trying to remove it too early may cause the filling to lose its shape.
Keep the Chocolate Drizzle Thin
A little dark chocolate goes a long way.
Use a teaspoon to create delicate lines across the surface rather than covering the cheesecake with a thick layer.
Use a Warm Knife for Clean Slices
Dip a sharp knife into warm water, dry it carefully and slice the cheesecake.
Repeat between cuts for a cleaner presentation.
Can You Make Chocolate Vanilla Cheesecake Ahead of Time?
Absolutely!
This cheesecake is ideal for preparing in advance because it needs several hours in the fridge to set.
You can prepare the biscuit base and filling the evening before you plan to serve it.
Leave the cheesecake covered in the fridge overnight.
For the best appearance, add the melted chocolate drizzle and cocoa powder shortly before serving.
This keeps the decoration looking fresh and helps the cheesecake maintain its lovely presentation.
Easy Variations to Try
The original recipe has a delicious combination of vanilla, chocolate and a gentle citrus flavour, but there are a few ways to adapt it.
Extra Vanilla Flavour
If you particularly enjoy vanilla desserts, use a good-quality vanilla extract for a more pronounced flavour.
Chocolate Orange Twist
A little finely grated orange zest can add a fresh citrus note that works beautifully with dark chocolate.
Individual Cheesecake Pots
Instead of preparing one large cheesecake, divide the biscuit mixture between small dessert glasses.
Top with the vanilla filling and refrigerate until set.
Decorate each portion with a little melted chocolate and cocoa powder before serving.
A Different Chocolate Finish
You can drizzle the chocolate in a simple zigzag pattern or create a delicate spiral across the top.
Keep the amount of chocolate the same if you want to preserve the original ingredient quantities.
Note: Any ingredient substitutions or additions may change the cheesecake’s texture, nutrition and setting time.
How to Store No-Bake Chocolate Vanilla Cheesecake
Keep the cheesecake covered in the fridge at 5°C or below.
For the best quality, enjoy it within 2–3 days, provided the dairy ingredients are fresh and the dessert has been handled and stored hygienically.
Store leftover slices in an airtight container to prevent them from absorbing other flavours in the fridge.
Can You Freeze This Cheesecake?
Freezing isn’t recommended for this particular recipe.
The yoghurt and gelatine-based filling may release moisture after thawing, which can affect its smooth texture.
For the best results, prepare the cheesecake fresh and keep it refrigerated until serving.
What to Serve with Chocolate Vanilla Cheesecake
This creamy dessert is delicious on its own, but it also pairs nicely with:
- Fresh strawberries
- Raspberries
- A few blueberries
- A cup of tea
- Freshly brewed coffee
- A small spoonful of natural yoghurt
Fresh berries are particularly lovely alongside the vanilla and chocolate flavours.
Frequently Asked Questions
Is This Chocolate Vanilla Cheesecake Really No-Bake?
Yes! The biscuit base doesn’t require baking, and the cheesecake filling sets in the fridge with the help of gelatine.
The only heating required is melting the low-fat spread and dark chocolate and preparing the jelly mixture with boiling water.
Can I Make This Cheesecake Without Cream Cheese?
Yes. This recipe uses vanilla yoghurt and quark instead of traditional cream cheese.
The combination creates a smooth, creamy filling with a slightly tangy flavour.
Why Isn’t My Cheesecake Setting?
There are several possible reasons.
The gelatine may not have dissolved properly, the mixture may not have chilled long enough, or the gelatine brand may require a different preparation method.
Check the packaging instructions and allow the cheesecake extra time in the fridge if necessary.
Can I Use a Different Size Cake Tin?
An 18cm springform tin is recommended for the proportions in this recipe.
A larger tin will produce a thinner cheesecake, while a smaller tin will make it deeper and may require longer chilling.
Can I Replace Quark with Greek Yoghurt?
Quark has a thicker texture than many yoghurts, so replacing it may change the consistency of the filling.
For the most reliable result, use plain quark as listed in the recipe.
How Long Does This Cheesecake Need to Chill?
The biscuit base needs approximately 30 minutes in the fridge.
After adding the filling, refrigerate the cheesecake overnight or until completely set.
How Many Servings Does This Recipe Make?
This recipe makes 8 equal slices when prepared in an 18cm round cake tin.
Can I Use Milk Chocolate Instead of Dark Chocolate?
You can use milk chocolate if you prefer a sweeter topping.
However, this will change the flavour and nutritional values of the finished dessert.
Final Thoughts
This No-Bake Chocolate Vanilla Cheesecake is a wonderful dessert for anyone who enjoys creamy vanilla flavours with a little chocolate.
The thin bourbon biscuit base, smooth yoghurt and quark filling, and delicate chocolate topping create a lovely combination of textures without requiring any baking.
It’s easy to prepare, perfect for making ahead and attractive enough to serve at family gatherings or special occasions.
Whether you enjoy it with fresh berries or simply alongside a cup of tea, this homemade cheesecake is a delicious treat worth trying.
If you enjoy creamy make-ahead desserts, you might also love our Blueberry Muffin Cheesecake, topped with fresh blueberries and crunchy cinnamon crumble.
For helpful information about enjoying a varied and balanced diet, visit the NHS healthy eating guide.
Have you tried this No-Bake Chocolate Vanilla Cheesecake? Leave a comment below and let me know how yours turned out!